Welcome to RhinoDox. In this article we will cover:
- Support and our Knowledge Base
- Creating a Project
- Generating a Proposal
- Revising vs Rebidding a Proposal
- Marking a Project Submitted
Knowledge Base
RhinoDox has built out an extensive and growing knowledge base. It can be found in two places:
Option 1: Go to www.RhinoDox.com and click ‘Resources’ at the top then select Knowledge Base

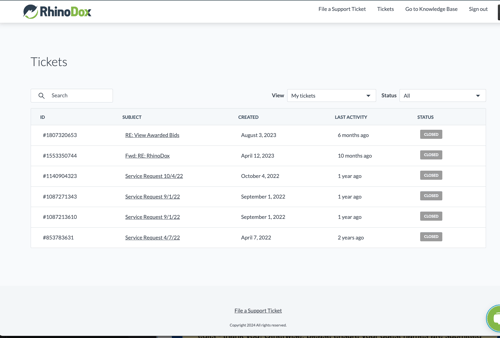
Option 2: While signed into your account, click the ‘Help’ button in the lower left corner in the screen shot below:
-png.png?width=627&height=357&name=Screenshot%20(11)-png.png)
Contacting Support
Searched the Knowledge Base but still stuck? There are three ways to ask for help when you get stuck:
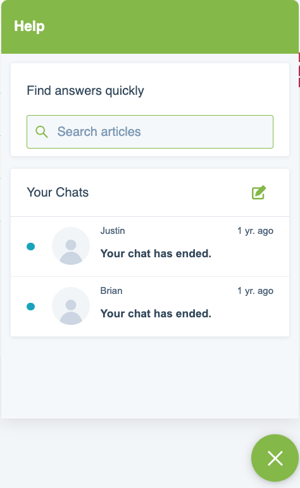
1. Customer Portal: This is the best way to contact RhinoDox. When you click the Help button described above, it takes you to our customer portal. You can register a support account by entering your email and creating a password.-
- NOTE: This can be a different password than your login to RhinoDox.
- Creating a customer support portal account helps keep track of all your support tickets with RhinoDox.
- When a ticket is created in the support portal, it alerts our support staff and other members of the RhinoDox team
- This option will get you and your team the BEST response time of all options
2. Email: You can also send an email to support@rhinodox.com. This will create a support ticket as well as alert the same people above. Doing it this way will not tie the support ticket to your account BUT you will get a high level of support.
3. Chat: Use the ‘Chat’ to communicate real time with RhinoDox team members. It looks like this:
Create a Project
RhinoDox has been configured by your company to collect the right amount of data to help streamline and automate the end to end process of your bidding.
STEP 1 - Create a Project and entering in the Project Details
A project can be created in two ways:
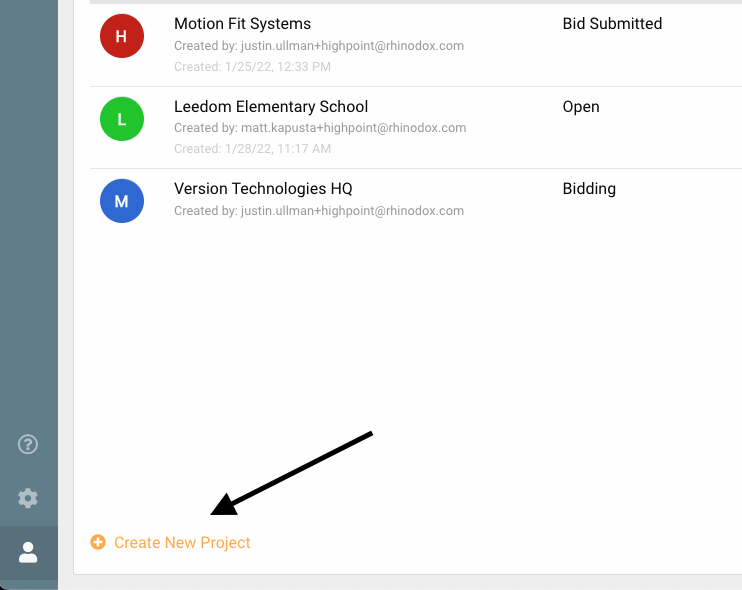
- When you log into RhinoDox you will land on the "My Projects" page, you can click "Create New Project" here.
- New projects can also be opened on the Project Pipeline page, click Projects->Project Pipeline then select "Create New Project" in the bottom left corner:
STEP 2 - Project Details
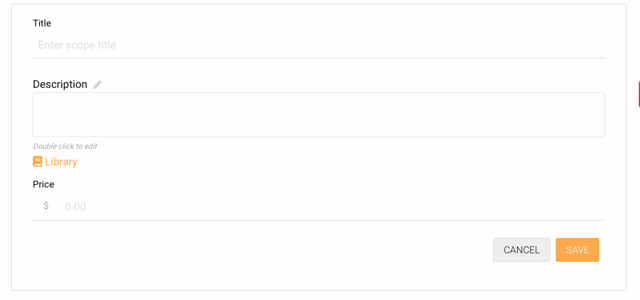
Once you've clicked "Create New Project", you will be directed to the project details page to enter the project's basic information. Below is what an empty project looks like:

The first step on this page is to select the Estimator from drop down list. Below are the remaining fields to set up and what they mean:
- Estimated Start & Completion Dates - This is used in Bid Analytics Backlog Dashboard to help visualize your backlog and details around margin. These details and ALL details on this page can be changed.
- Bid Due Date - When a project is created, enter the Bid Due Date.
- Divisions - Some clients configure accounts to separate different lines of business or locations and this field is where you do that. RhinoDox also has the ability that when you select a Division, you only see certain templates or certain libraries. You can also filter the RhinoDox Bid Analytics dashboards by Division if this is configured
- Branch - Configurable dropdown for different branches
- Bid Type - Configurable field for tracking hit ratio by types of bid.
- Project Category - You can select a Project Category and Sub-Category to track margin and hit ratio by project type
- Address - This is the Project address. If no address information is entered, we will not print the address information to the proposal
- GC - This is where you add a GC to your project. If you have contacts that are associated with a GC you can select them from the drop down list. IF a GC is not listed in the search, you can add a GC right here. If you have to add a contact, please see the instructions below on adding a GC Contact
- Architect - You can store a list of architects and select them from here. Instructions are below if an architect is not listed and you need to add it
NOTE: You must click ‘SAVE’ in the bottom right corner to save this information any time you enter it or update it.
Watch a quick walkthrough video below to see the process from start to finish:
Create a Proposal
Now that we have created our Project, let's build our first proposal. See the video below for a walkthrough of creating a proposal from start to finish:
Important things to note on Saving proposals:
Saving: A proposal may be saved at any point during it's creation. Click the 'Save' button in the lower right of your proposal and come back to it at any time.
Save and Complete: This button will generate a proposal for you.
IMPORTANT - Saving Scopes and Alternates: When you add a Primary Scope or Alternate, these have to be saved on their own. You will see a button that looks like this and note that it is NOT the same as Saving the Proposal or Saving and Completing a Proposal.
Great job on creating your first Project and Generating a Proposal. Need to make some changes OR Rebid the entire job?
Check out this article and walkthrough on 'revising a bid' vs 'rebidding'